
The Tartan 41 is known as an offshore racer, and as such, its design doesn’t feature many holes in the deck, to make sure its secure from green water. For most cruisers at anchor however, these holes in the deck are otherwise known as ventilation. Despite her racing heritage, Alchemy will be spending most of her time at anchor, and so we are definitely short of ventilation, with just two hatches and a single cowl that feeds four dorades.
I wanted to add more ventilation, and wanted something that was proof against rain, green water and also might help cool the galley. After some research I settled on a dorade set up, but one that had an active fan option to draw hot galley air out.
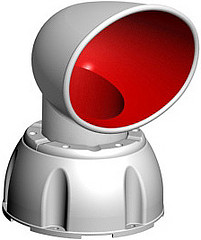
 The ventilators are called the Air Only Dorade Ventilator and are made by Modis Maris in Malta. To quote the site “The cowl and dorade box made of extremely UV-stabilized plastics : Luran S. We guarantee no yellowing, no weathering as minimum for 15 years”
 They use an innovative “floating ball” concept to trap incoming water instead of the usual dorade baffles. This means their footprint on the deck is MUCH smaller. They also have an option to mount a fan on the inside trim to pull air in or out on windless days.
Modus Maris were kind enough to offer us two dorades to install on Alchemy.
The Dorade Installation
As with all procedures involving drilling holes in your deck, a drink is well worth it to steady the nerves. The plan was to install one on each side of the deck just in front of the dodger, just in front of the traveller. Finding some kind of center line was surprisingly difficult. A 40 year old lump of fiber glass does not really have many “plumb” points, and depending on whether we used the mast, toerail, companion way, the places for the holes were all different. In the end, we sort of took an average of them all and added the ‘ol eyeball. Then drilled.

Here you can see we are starting to cut in with the hole saw. I bought one specifically the right size for the templates provided by air-only. I think I prefer a hole saw rather than trying to use a jig saw. My hand isn’t that steady, and as long as you are slow and steady a hole saw works great.

At this point we have gone through the deck. Seeing dry balsa sandwiched in between the fiberglass is cause for celebration. Time for another drink!

At this point, you should go read the extremely helpful articles by Compass Marine. In fact, you should have read them before drilling that hole! We are following his excellent article on sealing the deck. A handy tip before getting to work is to tape up a plastic bag on the inside to catch cack as it falls down.

The key to making sure the epoxy seal works is to cut back the balsa core a bit, in this case using a dremel as Compass Marine recommends.

The clever part is that the dremel head is pretty much the exact right length to match the thickness of the core. This means you can gently use the shaft of the dremel as a guide and cut a way a nice 1/4″ indent of blasa to epoxy over.

I used West System. I found it helpful to make it goopy, about peanut butter consistency, in order to smear it on the core cutaway easier.

I found the most effective way to get the epoxy on was to smear it on with a small wooden splint, and then press in with press and smear round with my finger. This made sure it got into all the cracks. I then put more on with the splint and use the two decks as a guide to scrape the splint around and get a smooth finish.

Next up is installing the Dorades.
